I have 3 suggestions for making your own card blanks:
1. Make Cards using Plain Card Paper
2. Double-fold Low Quality Paper
3. Recycle Unused Christmas/Greeting Cards
1. Make Cards using Plain Card Paper.
Buy unscored unfolded card paper in A4 size sheets with a weight of between 120 - 150 gsm. These can be found for sale in stationary shops, large supermarkets and in online stores in the Paper or Card Stock section. They usually come in packs of 50 sheets and are available in lots of colours - white sheets are usually cheaper than coloured. If you are confident in folding card you can fold it yourself without scoring it. But the heavier the card, the more necessary it is to score the card - that means, make an indent in the card at the point where it will fold. Scoring sets usually consist of a plastic knife and a sheet with card sizes marked on it, that you place your card. The sheet will indicate, for different card sizes, where the centre of the card is and gives a guide to score a straight line.

2. Double-fold Low Quality Paper.
A simple way to turn photo-copy paper into a heavier card is to fold it a few times - take an A4 sheet of photo-copy paper and fold it in half (on the longest side). Then fold that in half again.


3. Recycle Unused Christmas/Greeting Cards.
My favourite and simplest option ever is to recycle your old greeting cards or unused Christmas cards. This option is especially good for making every-day cards with young children. You need paper paste and some blank / coloured / patterned paper for this option.

Simply apply paper paste to the face of the old greeting card and place your paper over it.

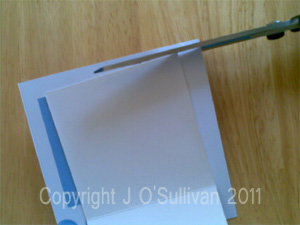
Cut around the edges of the greeting card to cut away the excess paper.


Now you have a blank card! If there is a logo on the back of the card, and you want to also cover it up, you can do the same as you did for the face of the card. Or, as in the example shown here, a fancy sticker can be applied over the logo.

 For the inside of the old greeting card you need to do the same thing, but usually you won’t have to paste over the whole inside - just cut a square/rectangle of paper out that will cover all the old greeting and message. You can add an extra sheet of paper if the old greeting can still be seen coming through.


1. Make Cards using Plain Card Paper
2. Double-fold Low Quality Paper
3. Recycle Unused Christmas/Greeting Cards
1. Make Cards using Plain Card Paper.
Buy unscored unfolded card paper in A4 size sheets with a weight of between 120 - 150 gsm. These can be found for sale in stationary shops, large supermarkets and in online stores in the Paper or Card Stock section. They usually come in packs of 50 sheets and are available in lots of colours - white sheets are usually cheaper than coloured. If you are confident in folding card you can fold it yourself without scoring it. But the heavier the card, the more necessary it is to score the card - that means, make an indent in the card at the point where it will fold. Scoring sets usually consist of a plastic knife and a sheet with card sizes marked on it, that you place your card. The sheet will indicate, for different card sizes, where the centre of the card is and gives a guide to score a straight line.
2. Double-fold Low Quality Paper.
A simple way to turn photo-copy paper into a heavier card is to fold it a few times - take an A4 sheet of photo-copy paper and fold it in half (on the longest side). Then fold that in half again.
3. Recycle Unused Christmas/Greeting Cards.
My favourite and simplest option ever is to recycle your old greeting cards or unused Christmas cards. This option is especially good for making every-day cards with young children. You need paper paste and some blank / coloured / patterned paper for this option.
Simply apply paper paste to the face of the old greeting card and place your paper over it.
Cut around the edges of the greeting card to cut away the excess paper.
Now you have a blank card! If there is a logo on the back of the card, and you want to also cover it up, you can do the same as you did for the face of the card. Or, as in the example shown here, a fancy sticker can be applied over the logo.
Comments
Post a Comment